


Introduction
In this tutorial, you will learn how to use environment variables in flutter using the flutter_dotenv package.
Environment variables are a set of parameters that help the system understand the running environment and provides value unique to the running environment.
Think of a case where you need to integrate a payment gateway like Flutterwave/Paystack in your flutter app. You are provided with Sandbox and Live keys when you register on either of those platforms. Now, instead of manually changing your keys in the code when you switch from staging to production, all you need to do is set environment variables that stores the sandbox and live keys for staging and production environment. Meaning you don't have to worry about the environment you're running your project on, the system detects this and uses the appropriate key value.
For this tutorial, we are going to add the env file we create to .gitignore so our Api keys doesn't get published to the repo, but we would create an example env file that would get published to the repo.
Enough talking, let's get into coding.
Create a new Flutter project
Create a new flutter project on your Android Studio or Vs Code and name it env_test.
Install flutter_dotenv
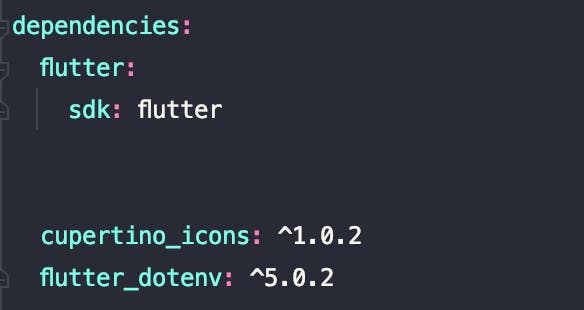
Add the following package to the dependencies in your pubspec.yaml file:
flutter_dotenv: ^5.0.2
Run pub get in your terminal to install
Create env files
For this tutorial, we would create 3 env files as follows:
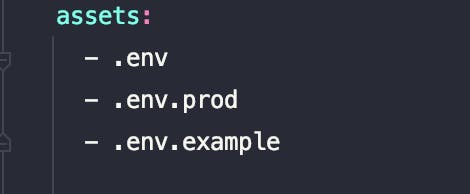
.env .env.prod .env.example
The .env file would be used for sandbox keys, .env.prod for production keys and .env.example is to keep a record of API keys used in the project.
Why do we have a
.envand.env.prodfiles and not just a single.envfile?
The .env is used to store sandbox keys while the .env.prod is used to store the production keys. The system would switch automatically between these files in debug and release mode. It uses .env in debug mode and .env.prod in release mode.
Why is the
.env.examplefile is needed?
This file is needed to keep a record of all API keys used in the project since we won't be pushing the .env and .env.prod files to the repo. We create the .env.example file with the same credentials used in the .env file but with an empty value. Imagine a new developer is assigned to the project and he clones the repo, he wouldn't get the .env files used in the project since it's not been pushed to the repo, meaning he wouldn't exactly know the keys used in the project. The .env.example file pushed to the repo is there to guide him so he's able to see the keys used in the project with an empty value and of course he can always fetch the correct API keys from the respective platforms and then create his own .env files.
Add API credentials to the files created
Let's create a sample key called EnvTestKey.
Give it a value of debugKey908 in .env file, a value of prodKey809 in the .env.prod file and a value empty in the .env.example file as follows:
.env
EnvTestKey=debugKey908
.env.prod
EnvTestKey=prodKey809
.env.example
EnvTestKey=
Add .env files to pubspec.yaml
Let's add the files we have just created under assets in the pubspec.yaml file.
Run pub get in your terminal to fetch assets.
Add .env and .env.prod to .gitignore
We don't want our keys exposed, so we're going to instruct the vcs system to ignore the files whenever we commit.
Open up your .gitignore file and add the following:
*.env
*.env.prod
Initialise flutter_dotenv in your main.dart
We are going to make flutter fetch the appropriate .env file based on the environment we are running and then render the app. To achieve this, we have to convert the current void main() to a Future as follows:
From this
void main() async {
  runApp(const MyApp());
}
To this
Future<void> main() async {
  if (kReleaseMode) {
    await dotenv.load(fileName: ".env.prod");
  } else {
    await dotenv.load(fileName: ".env");
  }

  runApp(const MyApp());
}
The kReleaseMode variable is a variable that returns true if we're running on a release environment and false if otherwise. You can get this variable by importing the following in your main.dart :
import 'package:flutter/foundation.dart';
Import flutter_dotenv in main.dart as follows:
import 'package:flutter_dotenv/flutter_dotenv.dart';
Use the created environment variables
Full code
import 'package:flutter/foundation.dart';
import 'package:flutter/material.dart';
import 'package:flutter_dotenv/flutter_dotenv.dart';

Future<void> main() async {
  if (kReleaseMode) {
    await dotenv.load(fileName: ".env.prod");
  } else {
    await dotenv.load(fileName: ".env");
  }

  runApp(const MyApp());
}

class MyApp extends StatelessWidget {
  const MyApp({Key? key}) : super(key: key);

  @override
  Widget build(BuildContext context) {
    return MaterialApp(
      title: 'Flutter Demo',
      theme: ThemeData(
        primarySwatch: Colors.blue,
      ),
      home: const MyHomePage(),
    );
  }
}

class MyHomePage extends StatelessWidget {
  const MyHomePage({Key? key}) : super(key: key);

  @override
  Widget build(BuildContext context) {
    return Scaffold(
      body: Center(
        child: Text(
          dotenv.env['EnvTestKey'] ?? '',
        ),
      ),
    );
  }
}
Debug mode output

Debug mode loads the > .env file.
Release mode output

The release mode uses the > .env.prod file we created.
Conclusion
In this tutorial, you learned how to create environment variables in flutter using > flutter_dotenv, you also learned how to ignore the env files you do not want to push to Github using the > .gitignore file.